Loading
Watercolor Daily · Guides
Dry Brush Watercolor Technique: 8 Tips for Broken Texture
11 min readBy Marcus Reed
Review
Watercolor Techniques
The dry brush watercolor technique uses thick paint and very little water, pulled lightly across dry paper so the color catches only on the raised grain. What you get is a broken, scratchy stroke with white paper showing through. That's how painters suggest light on water, bark, grass and old wood without painting every detail.
This guide gives eight tips on paper, brush and loading, a five-step practice drill, and what two painters known for it, Winslow Homer and Andrew Wyeth, show about using it well.
In short: Use cold press or rough paper and make sure it's completely dry. Mix the paint thick, load a flat or the side of a round, then blot the brush on a paper towel until it barely marks. Hold it low and drag it quickly and lightly. Too much water or pressure fills the hollows and the texture disappears. Test every load on a scrap before it touches the painting.
What is the dry brush watercolor technique? (quick answer)
Dry brush means painting with a brush that holds lots of pigment but little water, dragged over dry paper. The paint sticks to the high points of the paper's texture and skips the low points, so the stroke is broken instead of solid. Winsor & Newton describes it as "using less water, to leave more pigmented, scratchy marks."
Overview
These dry brush watercolor technique tips are for painters who can lay a basic wash and want texture without masking fluid or salt. You need:
- Textured paper. Cold press or rough, 300 gsm (140 lb) or heavier, so the sheet stays flat.
- A flat brush and a round. Synthetic is fine. An old brush with spread hairs is useful too.
- Paint you can mix thick. Tube paint mixes thick most easily, but pans work if you wet them well first.
- A paper towel and a scrap of the same paper for testing.
Dry brush is usually the last layer in a painting. Washes go down first and dry. Then the dry brush strokes add texture on top. For the paper side of this, the rough watercolor paper guide explains why the most textured sheet gives the most broken stroke.
8 Dry Brush Watercolor Technique Tips
Before you paint: paper and brush
1. Pick paper with tooth. Tooth is the raised grain on the surface of the paper. Cold press has a medium tooth and rough has the most. Winsor & Newton notes that on rough papers pigment settles into "the crevices of the paper", and dry brush uses the same grain from the other side, putting paint on the peaks. Smooth hot press has so little tooth that a dry brush stroke often comes out flat. The hot press vs cold press comparison shows the three surfaces side by side.
2. Use a brush with spring, held on its side. A flat gives a wide band of texture, good for water and wood grain. The side of a round gives narrower marks for bark and branches. A springy brush bounces over the grain, where a soft, floppy one sinks into it.
3. Keep an old, splayed brush. A brush whose hairs have spread is no good for a point but very good for grass, fur and hair. Each clump of hairs leaves its own line, so one stroke reads as many blades.
Loading the brush
4. Mix the paint thick. The paint should be closer to cream than to tea. A watery mix floods into the hollows of the paper as soon as it lands. Thick paint stays where the brush puts it.
5. Blot, then test. Load the brush, then touch the belly to a paper towel to draw off water. Andrew Wyeth described squeezing the moisture out of his brush with his fingers "so that there is only a very small amount of paint left." Then make one stroke on the scrap. If it comes out solid, blot again. If it barely marks, reload.
Making the stroke
6. Hold the brush low. Tilt the handle down until the brush is nearly flat to the paper, so the side of the hairs does the work. A brush held upright puts its tip into the hollows and fills them.
7. Move fast and light. Speed and pressure control the texture. A quick, light stroke skips across the peaks. A slow, heavy one fills the paper in. If you want more coverage, press slightly harder rather than adding water.
8. Follow the subject's direction. Drag horizontally for sun on water, along the length of a trunk for bark, and in short upward flicks for grass. The broken edge of the stroke follows the direction you moved, so the texture reads as the surface it describes.
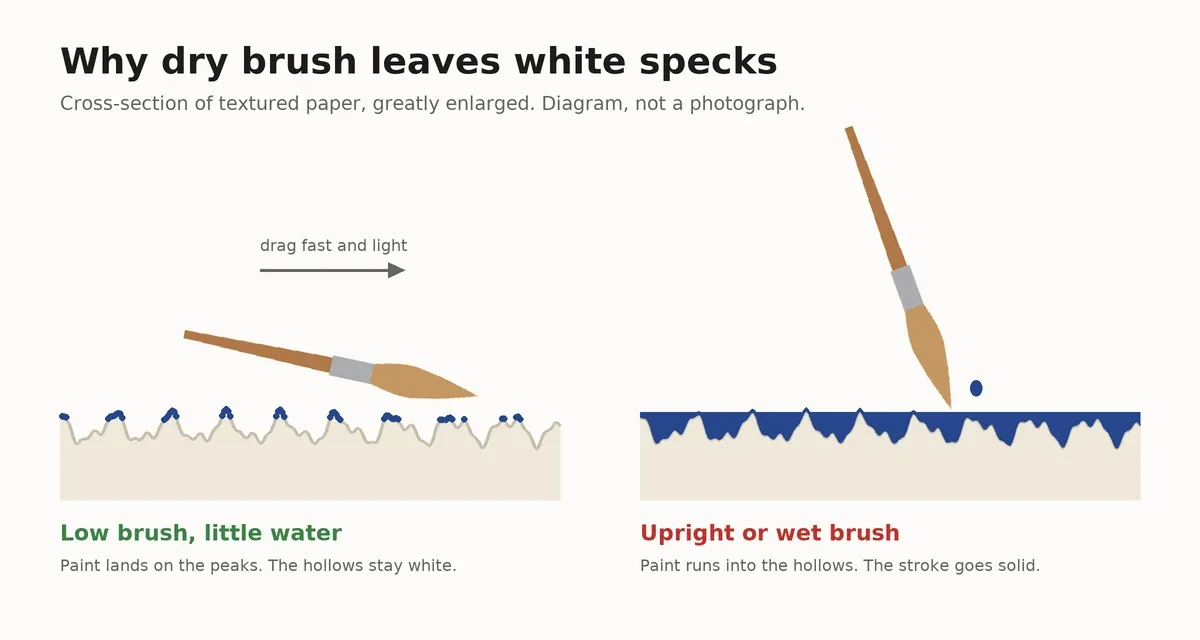 Why the angle matters. A low, nearly dry brush touches only the high points of the grain, so white paper shows between them.
Step-by-Step: A 5-Step Dry Brush Practice Drill
This drill takes about ten minutes on a quarter sheet. It teaches what the right amount of water feels like.
1. Paint a pale wash and let it dry. Lay a light blue or grey wash across the lower half of a cold press sheet and leave it until it's completely dry. Dry brush on damp paper spreads and loses its edge.
2. Mix one dark, thick color. A deep blue or brown works well because the broken texture shows clearly against the pale wash. Mix enough for several loads.
3. Make a strip of five test strokes. Load, blot and drag a stroke on the scrap. Then do it four more times, blotting a little more each time. You'll see the stroke move from solid to broken to barely there. The middle ones are dry brush.
4. Paint sparkle on water. Using the load that gave the best broken stroke, drag horizontal strokes across the dried wash with a flat held low. Leave gaps. The white specks that the brush skipped read as light on the surface.
5. Change only the pressure. On the same load, make three more strokes: light, medium and firm. Pressure alone changes how much paper the stroke covers, with the same water in the brush, so you can adjust coverage mid-painting without reloading.
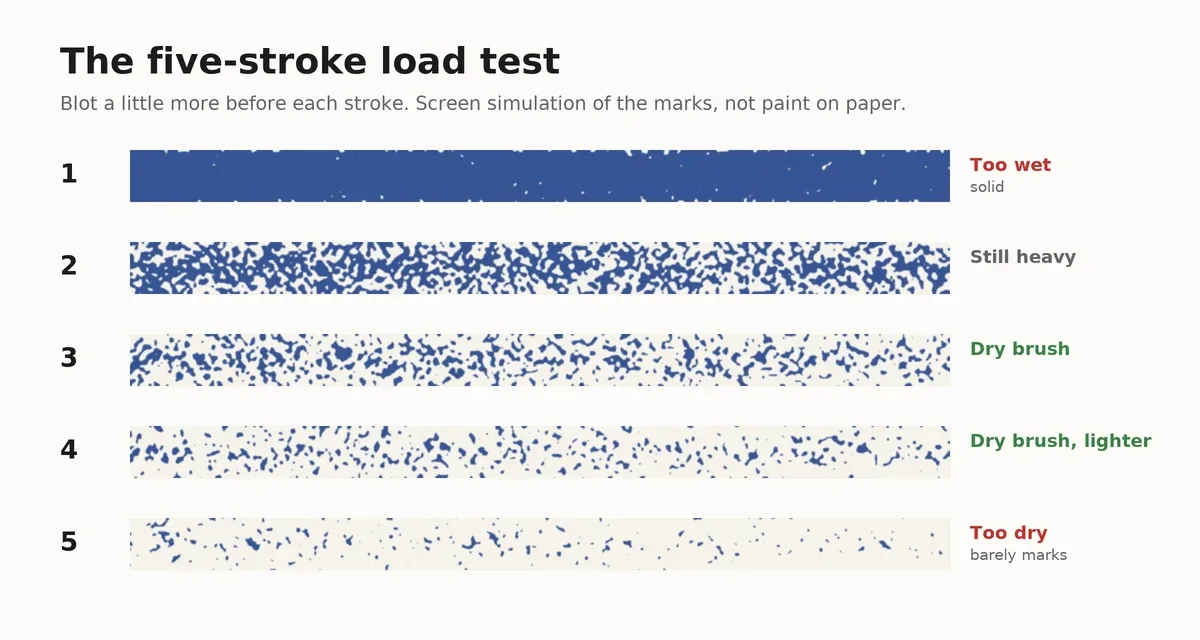 A simulation of the five test strokes from step 3. Strokes 3 and 4 are the load you want for dry brush.
Winsor & Newton's Masterclass video on dry brush shows the stroke in motion, which is easier to copy than any description of brush angle.
GODEEPER: Dry brush works best over a dry wash with a clean, hard edge. The wet-on-dry guide covers getting those first layers right. Wet-on-Dry Watercolor Technique: Crisp Edges in 6 Steps →
Tips From Homer and Wyeth
Two American painters show two different ways to use the dry brush watercolor technique: as a small accent, or as the main way of painting.
Winslow Homer: a few strokes of light
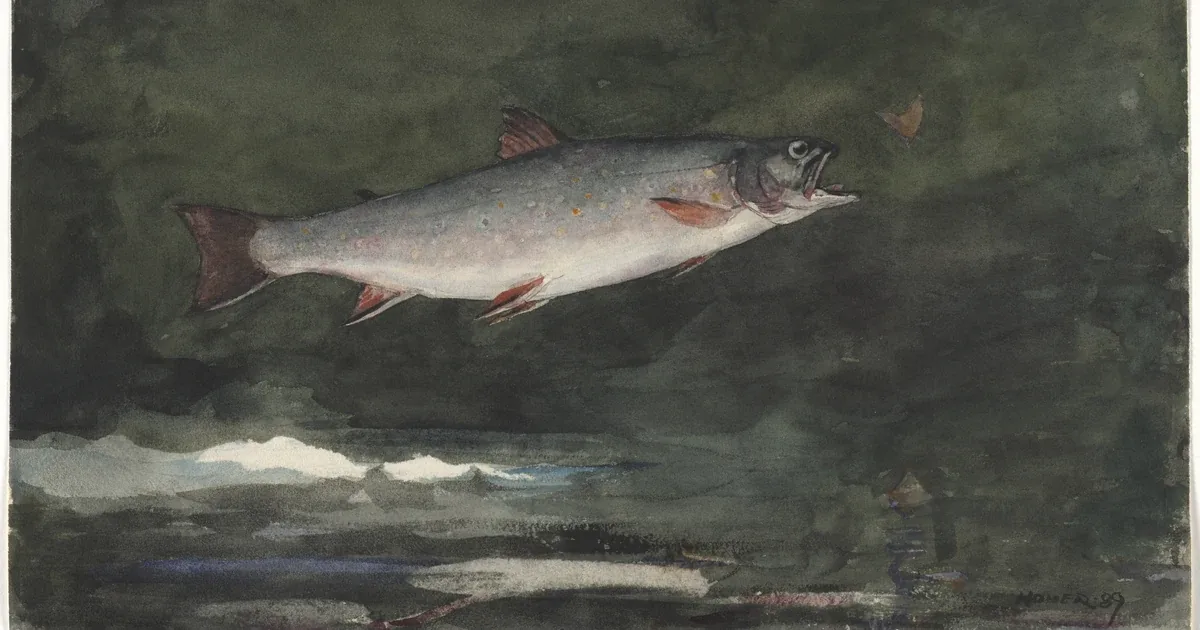
Homer's Leaping Trout (1889), at the Cleveland Museum of Art, is mostly made of wet, dark washes. The museum notes that Homer used scraping for two bright white highlights and "dry brushing to produce the impression of a reflective surface" on the water. It takes up only a few broken strokes along the bottom of the sheet, and those strokes make the surface look wet and bright. Most painters should start the same way, with a few dry brush strokes over finished washes where they want texture or sparkle.
Andrew Wyeth: drybrush as a whole method
Wyeth catalogued many works as drybrush, such as Crow's Foot (1975), listed by Sotheby's as "drybrush and watercolor on paper." In a statement quoted in that lot essay from John Wilmerding's 1987 book on the Helga pictures, he described the method this way:
"I paint with a smaller brush, dip it into the watercolor color, play out the brush and bristles, squeeze out a good deal of the moisture and color with my fingers so that there is only a very small amount of paint left . . . good drybrush is done over a very wet series of washes . . . Drybrush is layer upon layer."
He took the water out of the brush with his fingers, and he built the drybrush strokes up in layers over wet washes laid first. He called it "a definite weaving process." Sotheby's notes that drybrush gave him finer detail and richer surface texture than his other watercolors. That takes many slow layers, so start with Homer's way and save Wyeth's for later.
Common Dry Brush Mistakes
Painting on damp paper. If the wash underneath is still cool to the touch, it is still damp. The dry brush paint spreads and the edge goes soft. Wait, or use a hair dryer on a low setting.
Too much water in the brush. The most common reason for a solid stroke. Blot more and test on scrap before every pass.
Going over the same stroke twice. A second pass fills the gaps the first one left, and the white specks are the point. Make one stroke and move on.
Using it everywhere. Dry brush texture on every surface flattens a painting. Keep it for the places that need texture or sparkle, and let smooth washes carry the rest.
GODEEPER: Dry brush is one way to keep paper white. The snow guide compares it with masking fluid, lifting and salt for clean whites. How to Paint Snow in Watercolor: 9 Tips for Clean Whites →
Frequently Asked Questions
What is the dry brush watercolor technique? Dry brush is a watercolor technique where you paint with a brush that holds thick paint and very little water, dragged lightly over dry paper. The paint catches on the raised grain of the paper and skips the hollows, so the stroke comes out broken and textured instead of smooth.
What paper is best for dry brush watercolor? Cold press or rough paper. Both have a textured surface with raised peaks for the paint to catch on. Rough gives the most broken, sparkling stroke. Smooth hot press paper has almost no tooth, so a dry brush stroke tends to come out solid or streaky instead of broken.
What brush is best for dry brushing? A flat brush or the side of a round with some spring. A flat gives wide, even texture for water and wood grain. The side of a round gives narrower marks for bark and grass. An old brush with spread hairs is useful for grass and fur, because each clump of hair leaves its own line.
Why does my dry brush stroke come out solid? There is too much water in the brush, the stroke is too slow, or you are pressing too hard. Blot the brush on a paper towel until it barely leaves a mark, hold it lower to the paper and pull it quickly. Also check that the paper underneath is completely dry.
Can you dry brush over a wet wash? Not while it is still wet. On damp paper the paint spreads into the fibers and the broken edge disappears. Andrew Wyeth said good drybrush is done over a very wet series of washes, layer upon layer: the washes go down first, and the drybrush strokes go on top later.
What is dry brush used for in watercolor? Texture and sparkle. Painters use it for light on water, tree bark, wood grain, grass, rocks, fur and old walls. Winslow Homer used dry brushing for the reflective surface of the water in Leaping Trout (1889), according to the Cleveland Museum of Art, which owns the painting.
Related Reading
- Best Watercolor Brushes for Beginners: 3 Shapes to Buy: the flat and round this technique needs, and how to choose them.
- 10 Easy Winter Watercolor Ideas From a 4-Tube Palette: winter subjects where a few dry brush strokes add bark and frost.
- Granulating Watercolors Explained: 7 Pigments That Settle: the other way paper texture shows up in a wash.
References
Was this guide helpful?

Written by
Marcus ReedTechnique Editor
Marcus Reed writes Watercolor Daily's step-by-step technique guides: wet-on-wet washes, glazing, dry brush, and the water control underneath them.
NextKeep reading
Guides / 11 min
Flat Wash Watercolor Technique: Flat and Graded in 5 Steps
Guides / 12 min
Masking Fluid Watercolor Guide: 7 Steps and 3 Products
Guides / 10 min
How to Paint Snow in Watercolor: 9 Tips for Clean Whites
Guides / 10 min
Wet-on-Dry Watercolor Technique: Crisp Edges in 6 Steps
Guides / 14 min
How to Clean Watercolor Brushes: 7 Steps, 3 Ways to Dry
Guides / 12 min
Glazing Watercolor Technique: 6 Steps to Layer Clean Color
Guides / 11 min
How to Stretch Watercolor Paper: 3 Methods by Weight
Guides / 12 min
Rough Watercolor Paper: Granulation, Dry Brush and 6 Steps
Disclaimer
This article is published for informational purposes and is not professional advice. Product formulations, pigment sources, packaging and store listings change. Check the details that matter to you (price, pigment content, regional availability) with the manufacturer or retailer before you buy.